Upgrading your computer’s RAM (Random Access Memory) is one of the most effective ways to boost your system’s performance. Whether you’re running multiple applications, editing videos, or playing high-end games, adding more RAM can help your PC handle heavier workloads without slowing down.
In this guide, we’ll walk you through everything you need to know about installing more RAM into your computer, from understanding its importance to choosing the right RAM and completing the installation process.
What Is Ram And Why Is It Important?
Before diving into how to install more RAM into your computer, it’s important to understand what RAM is and how it works.RAM is a form of short-term memory that temporarily stores data your PC needs to access quickly. When you open a program, it gets loaded into the RAM for faster access.
The more RAM you have, the more data your computer can handle at once, which translates into better multitasking and smoother performance.Think of RAM like a kitchen counter. If you have a small counter (low RAM), you can only work on a few things at once. But with a larger counter (more RAM), you can work on more things at the same time without things getting cluttered or slowing down.
Signs You Need More RAM:
You may need to install more RAM if you notice these signs:
- Slow Performance: Your computer takes longer to open programs or switch between them.
- Lagging in Games or Applications: You experience stuttering or freezing in high-performance tasks like gaming or video editing.
- Frequent Freezes or Crashes: When too many programs are running, your PC freezes or crashes frequently.
- System Warnings: You receive notifications that your system is running low on memory.
Can I add RAM to my system without removing the old RAM?
Yes, absolutely! If your system has empty RAM slots available, you can simply add more RAM without having to remove the existing sticks. This is a great option if you want to increase your system’s memory without losing what you already have.
Just make sure the new RAM is compatible with your motherboard and the existing RAM. Once added, the system should automatically recognize the extra memory. Finally, after installation, check your computer’s system settings to confirm that the new RAM is detected.
How Much RAM Do You Need?
The amount of RAM you need depends on your use case. For basic tasks like browsing the web, watching videos, or using office software, 8GB of RAM is usually sufficient. However, for gaming, video editing, or running virtual machines, you might want 16GB or more.
Here’s a quick guide on the optimal RAM sizes:
- 8GB: Suitable for general use, web browsing, and light gaming.
- 16GB: Ideal for more demanding tasks like gaming, editing, and multitasking.
- 32GB or more: Best for professional work, such as video editing, 3D rendering, and running virtual machines.
What RAM Is Compatible with My PC?
Although all RAM sticks (DIMM) serve the same primary function, they are not universally compatible. Different motherboards have varying requirements for RAM, including unique slot types and different protocols or pin layouts (e.g., DDR4 vs. DDR5). Manufacturers may also use different circuit designs, so it’s recommended to use RAM sticks from the same manufacturer for better compatibility.
To determine which RAM is compatible with your Windows PC, the best approach is to check your motherboard’s specifications in the owner’s manual. This will tell you the type of RAM your motherboard supports.Keep in mind that you cannot install RAM that exceeds your motherboard’s supported capacity. For example, if your motherboard supports a maximum of 32GB of RAM, you won’t be able to install 64GB of RAM, as it won’t work properly.
What Type of RAM is Compatible with My PC?
Not all RAM is compatible with every computer. To ensure you purchase the right RAM, you need to know your motherboard’s specifications. Here’s what to consider:
- RAM Type (DDR4, DDR5): Most modern computers use DDR4 RAM, but some newer systems may support DDR5, which is faster but more expensive.
- RAM Speed: The speed of the RAM (measured in MHz) should match what your motherboard supports for optimal performance.
- Capacity: Your motherboard will only support a certain amount of RAM, typically between 32GB and 64GB for most consumer systems.
- Form Factor: Desktop RAM typically comes in DIMM form, while laptop RAM is in SO-DIMM form. Make sure to choose the correct form factor for your system.
You can find this information in your PC’s manual or by checking the System Information in Windows.
How to Check What RAM Your Computer Supports?
To find out what RAM is compatible with your system, follow these steps:
- Check Your Motherboard’s Manual: The manual will indicate what types and capacities of RAM are supported.
- Use System Information:
- Open the Start menu, type “System Information,” and hit Enter.
- Look for “Installed Physical Memory (RAM)” to see how much RAM is currently installed.
- To find the motherboard model, scroll down to “BaseBoard Manufacturer” and “BaseBoard Product.”
- Use a RAM Compatibility Tool: Websites like Crucial or PCPartPicker offer tools that can tell you what RAM is compatible with your system.
Preparing to Install RAM:
Once you’ve determined the type and capacity of RAM your system supports, it’s time to prepare for installation. Before you begin, follow these essential steps:
- Turn Off Your Computer: Ensure that your computer is completely powered off.
- Unplug All Cables: Disconnect the power cable and all other peripherals.
- Ground Yourself: Use an anti-static wrist strap or touch a metal part of the case to discharge any static electricity. This will protect your components from static damage.
- Locate the RAM Slots: Open your PC case and locate the RAM slots on the motherboard.
Step-by-Step Guide to Installing RAM:
Open Your Computer Case:
To begin, power off your PC and remove the side panel of your desktop case. For laptops, consult the manufacturer’s manual to find how to access the RAM slots. This is a crucial first step, as it allows you to reach the RAM area. Ensure you’re working in a static-free environment to avoid damage.
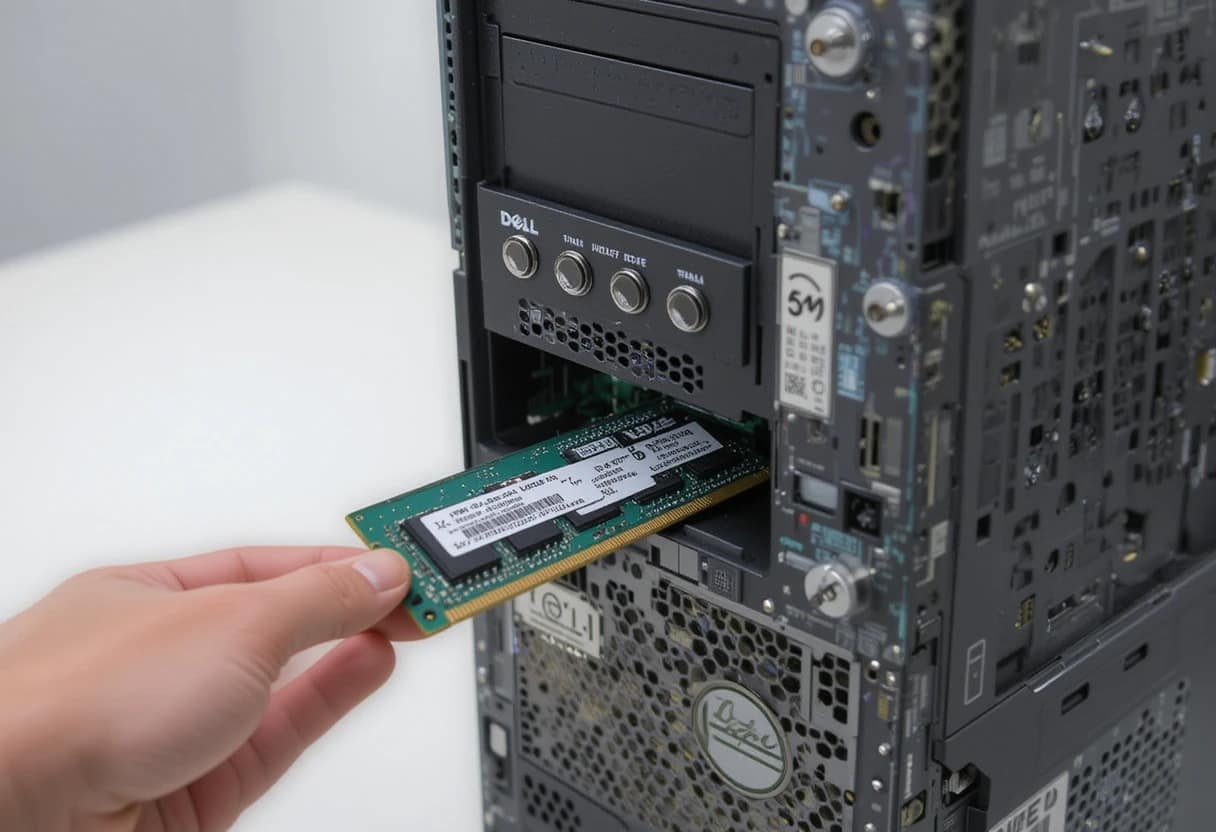
Locate the RAM Slots:
Once the case is open, locate the RAM slots on your motherboard. These long slots are usually positioned near the CPU, and if you already have RAM installed, you’ll see empty spaces for expansion. Make sure you identify the right slots to install the new RAM sticks, ensuring proper alignment.
Remove the Existing RAM (if needed):
If you need to remove old RAM, carefully release it by pressing down the locking tabs at both ends of the RAM stick. Gently pull out the RAM once it’s released. Don’t force it; the tabs should pop out with minimal effort, clearing space for the new RAM stick. Handle the RAM carefully to avoid damage.
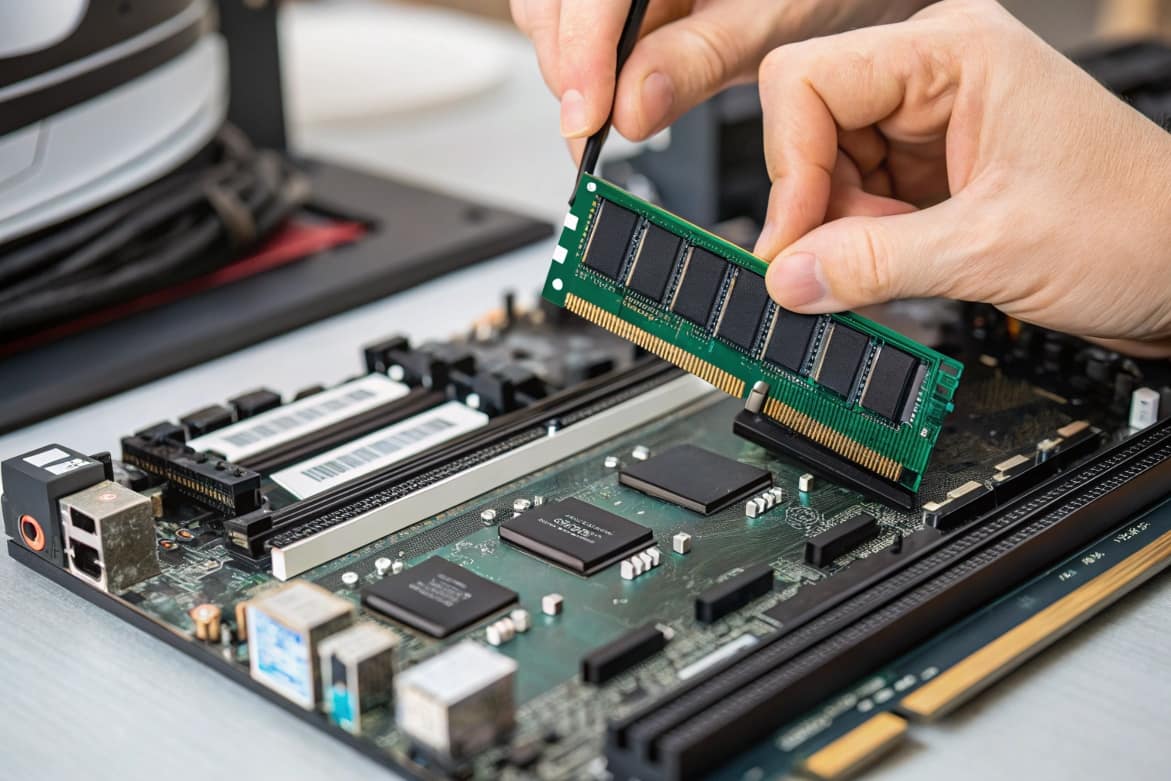
Align and Install the New RAM:
Now, carefully align the notch on the RAM stick with the notch in the RAM slot. This ensures that the RAM is inserted the correct way. Once aligned, press the RAM stick firmly but gently until you hear a click. The locking tabs should snap into place, securing the RAM stick properly.
Check the Installation and Boot Up:
Before reassembling the case, ensure the RAM is securely seated. Check that the locking tabs are fully engaged and the RAM stick is stable. Then, close the case, reconnect all cables, and power up your computer. To verify that your new RAM is detected, check the RAM details in the System Information section of Windows.
Optimizing RAM Usage After Installation:
Once you have installed more RAM, here are some tips to ensure that your system runs smoothly:
- Monitor RAM Usage: Use Task Manager to monitor RAM usage and ensure that your system is using the new memory effectively.
- Close Unnecessary Programs: Ensure that unnecessary programs aren’t consuming RAM in the background.
- Enable Virtual Memory: If your system is running low on physical RAM, enabling virtual memory (paging file) can help prevent crashes or slowdowns.
FAQS:
1. Can I use different brands of RAM together?
Yes, you can use different brands of RAM together, but it’s important to ensure that the RAM sticks have the same specifications (e.g., speed, voltage, and capacity). Mixing different brands might cause instability or prevent your system from running optimally, so it’s best to use matching RAM for smoother performance.
2. How much RAM do I need for gaming?
For most modern games, 16GB of RAM is usually sufficient. However, for more demanding games or tasks like video editing, 32GB might be a better choice. Keep in mind that the CPU and GPU also play a key role in gaming performance, so balance the entire system for optimal results.
3. Can I install RAM myself, or should I hire a professional?
Installing RAM is a relatively easy process and can be done by most people with basic computer knowledge. As long as you follow proper safety guidelines and ensure compatibility, it’s something you can easily do yourself. However, if you’re unsure, a professional can help.
4. What happens if I install incompatible RAM?
If you install incompatible RAM, your computer might fail to boot, crash, or not recognize the installed RAM. In some cases, the system might run slower or experience instability. Always check your motherboard’s RAM compatibility before upgrading.
5. Does more RAM make my computer faster?
While adding more RAM can improve performance, especially when running multiple applications, it doesn’t always result in a faster system. If your computer already has enough RAM for the tasks you perform, adding more won’t provide significant speed improvements. It’s more about having enough for your workload.
Conclusion:
Upgrading your computer’s RAM can significantly improve performance, especially when running demanding tasks like gaming, video editing, or multitasking. Before installing, ensure compatibility by checking your motherboard’s specifications. The installation process is straightforward but requires careful attention to avoid damage to the components.
Once successfully installed, monitor your system’s performance to ensure the new RAM is being utilized effectively. With these simple steps, you can enjoy a smoother, faster computing experience, tailored to your needs.


Leave a Reply